ASP.NET Core 7: Uploading files using Minimal APIs
The minimal APIs in ASP.NET Core 7 is one of the best features. I have already written a post on the minimal APIs. In this article, I will demonstrate an approach to uploading files using minimal APIs. I have already written a post on file upload using ASP.NET Core on this link.
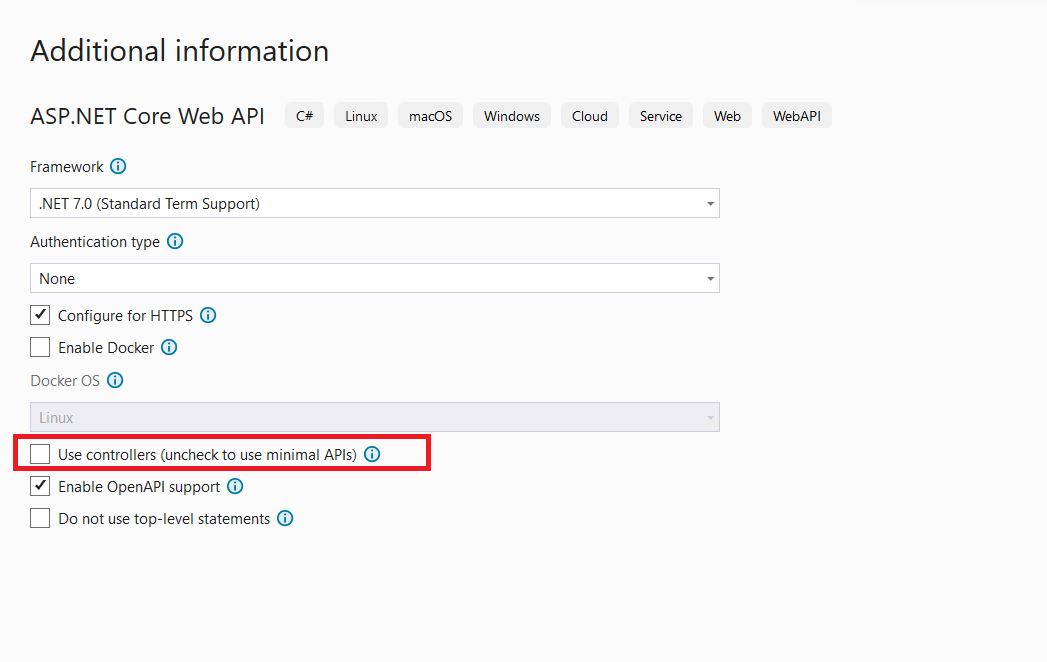
Step 1: Open Visual Studio 2022 and create a new ASP.NET Core API project targeted to .NET 7. Name this project Core7_FIleUpload_MinimalAPI. You need to make sure that, the checkbox Use controllers (uncheck to use minimal APIs) is unchecked as shown in Figure 1.
Once we uncheck this checkbox, then we will not see the Controllers folder in our project. We need to write the API login in Program.cs. In this project add a new folder and name it files. All uploaded files will be stored in this folder.
Step 2: In the Program.cs, we will create two APIs one each for uploading a single file and uploading multiple files. To upload a single file we use the IFromFile interface. This interface represents a file sent using the HttpRequest. To upload multiple files we will use the IFromFileCollection interface. This interface represents the collection of files sent using HttpRequest. To complete the upload operation, we need to read the filename of the uploaded file with its extension so that we can write the contents of the received file on the server in the files folder. We will be using the OpenWrite() method of the File class to create a new file and write the contents of the received file in it. The code in Listing 1 shows HTTP Post methods for uploading single and multiple files
#region Minimal APIs to upload files (Single and multiple)
app.MapPost("/upload", async (IFormFile receivedFile) =>
{
    // Read the folder where the file is to be saved
    var folder = Path.Combine(Directory.GetCurrentDirectory(), "files");
    // REad the Uploaded File Name
    var postedFileName = ContentDispositionHeaderValue
        .Parse(receivedFile.ContentDisposition)
        .FileName.Trim('"');

    // set the file path as FolderName/FileName
    var finalPath = Path.Combine(folder, postedFileName);
    using var fs = File.OpenWrite(finalPath);

    await receivedFile.CopyToAsync(fs);

});


app.MapPost("/uploadfiles", async (IFormFileCollection receivedFiles) =>
{
    // Read the folder where the file is to be saved
    var folder = Path.Combine(Directory.GetCurrentDirectory(), "files");
    foreach (var file in receivedFiles)
    {
        // REad the Uploaded File Name
        var postedFileName = ContentDispositionHeaderValue
            .Parse(file.ContentDisposition)
            .FileName.Trim('"');

        // set the file path as FolderName/FileName
        var finalPath = Path.Combine(folder, postedFileName);
        using var fs = File.OpenWrite(finalPath);

        await file.CopyToAsync(fs);
    }
});


#endregion
Listing 1: API methods for file upload operations
Run the application and test the API using the swagger page as shown in Figure 2
Figure 2: Uploading Single File
Once the Execute button is clicked, the file will be uploaded to the Server and we can see this file in the files folder. Similarly, we can test the upload multiple files API as shown in Figure 3
Figure 3: Uploading multiple files
Once the Execute button is clicked, you will find these selected multiple files uploaded file to the files folder.
The code for this article can be downloaded from this link.


